New features added, version 7.5.4 Patches, 8.4 Patches
![]()
Program GLTM, Account Maintenance, is used to maintain the chart of accounts for your enterprise and to maintain individual account information. You can also maintain the account structure, maintain the automatic undefined segments created by the sub ledgers, and view copy errors for accounts.
This program opens in query mode. Query the enterprise for which you wish to maintain GL accounts.
You can view enterprises other than the one you are logged into in program SPDM, System User Default Maintenance. When the Maintenance Allowed flag is set to on in the Account Selector screen, you can maintain accounts in the enterprise. You can only maintain the enterprise that you are logged into and its child enterprises (in the case of consolidated enterprises).
No changes made to the chart of accounts are saved until the [Commit] button is pressed.
Accounts can be used after basic creation is completed. They do not have to be added to the account structure. To complete basic creation, follow the steps listed in the Creating New Accounts (without assigning parent accounts)*Creating_New_Accounts_without_parents section.
You must enter at least one income account and at least one expense account, and enter a retained earnings account in program GMEM, Enterprise Maintenance, before postings are made to the general ledger. Otherwise, problems will occur.
If you receive a Group Cell Error in this program, check your registry for the FORMS45_PATH. If the registry entry is over 128 characters, Windows will ignore the registry entry.
Automatic Undefined Account Segments
Rules for Creating and Maintaining Accounts
Consolidation Accounts and Automatic Undefined Segments
Creating New Accounts (and assigning parents at the same time)
Creating New Accounts (without assigning parent accounts)
Adding a Parent Account to an Existing Account
Assigning Multiple Parent Accounts to an Account
Un-assigning Parent Accounts from an Account
Copying a Tree of Accounts from one enterprise to another
Accounts with automatic undefined segments are created in the chart of accounts when sub ledger journals are posted. This can cause a problem when the accounts are restructured, as information can be lost. To prevent this from occurring, this program provides a means to create the accounts in the chart of accounts before restructuring.
Press the [Automatic Accts] button to view the accounts that exist in the system that have automatic undefined segments, but have not been posted. These accounts do not yet exist in the chart of accounts.
Press the [Create Accounts] button to create them in the chart of accounts.
Account numbers with automatic undefined segments must have an existing default account number created in this program. For example, if the automatic undefined segment of an account number consists of the last three characters in the account number, the account number 200-10000-00-342 must have the default account of 200-10000-00-000. When accounts are created with automatic undefined segments, the default values for the new account are taken from the default account in program GLTM, Account Maintenance.
Account segments can be used in the parameter records to record a posting parameter value as a column reference in the account number.
For example, if you had multiple plants, and you wanted the plant code in which the transaction was entered to be recorded in the account number, you could set up an automatic undefined account segment to record the plant code. This allows one plant parameter record for multiple parameter values.
Defined, Soft-Defined, and Undefined segments must have accounts created in program GLTM, Account Maintenance, containing the segment values for the parameter items or the accounts will not post.
Automatic Undefined segments will have account numbers created with the parameter item in the segment when they are posted.
For more information, see Account Segments and Posting Parameter Records*Account_Segments_Posting.
Asset, Liability, Income, Expense, and Equity accounts are the traditional account classifications derived from the accounting equation. Intangibles can relate to an asset or expense account. Statistical can relate to any of the other classifications. Statistical accounts do not require balancing entries. Asset and Expense accounts are normally considered debit accounts, and Liability, Equity, and Income accounts are normally considered credit accounts.
General ledger accounts can now have associated statistical accounts to track quantities. Statistical accounts are defined in program GLTM, Account Maintenance. Statistical accounts are created to track a particular type of quantity, and other detail posting accounts will reference the statistical account.
A unit of measure is associated with the statistical account. Statistical accounts are used to attempt unit conversions when posting from the application journals. However, converting and comparing balances for quantity accounts is not possible at this time.
No journal entries are generated for the quantity account postings. They are calculated and posted directly during the General Ledger posting process. Manual journal entries involving quantities or quantity accounts can be entered in program GLJE, GL Journal Entry.
The following rules govern the creation and maintenance of accounts.
1. Account class, summary/detail, and debit/credit can be changed at any time before posting to the account, but not afterwards. The parent account, account description, account type, 1099 code, unit of measure, and forecast can be changed at any time.
2. The delete flag can be set to on only if it does not break a parent chain within the enterprise and does not remove a link in a consolidation chain. Accounts to which postings have been made cannot be deleted, but can be inactivated by having the Delete flag set to on. When program GLAP, GL Account Purge, is run, the account will not be deleted.
The parent account is the summary account used to summarize fully qualified accounts (FQA's) for inquiries and reporting. Summary account detail is not consolidated to the consolidation enterprise. Each enterprise can have its own summary/parent account structure. If parenting is to vary in the consolidation enterprises from the local enterprise, the fully qualified accounts (FQA's) should not have the parent accounts specified before copying accounts to other enterprises. During journal posting, the dollars posted in detail accounts are summarized to the specified parent account and can be used later for multiple inquiries.
Accounts can have more than one parent account.
An account must be detached from its parent accounts before it can be deleted. If the account is a parent account, all children must be removed from the account before it can be deleted.
The following rules govern parent account numbers:
1. Parent/summary accounts do not consolidate during the Enterprise Consolidation process. Only detail accounts roll to the consolidated enterprise. The parent accounts are then recalculated and rolled up within the consolidation enterprise based on the consolidation's parent/summary account structure.
2. Parent/summary accounts must be in the same enterprise as the detail account being entered or maintained.
3. Parent accounts must be summary accounts, created before they are used as parent accounts. An account that is currently a detail account can be converted to a summary account by specifying it as a summary account of a detail account.
4. Parent accounts can themselves have parent accounts.
5. The parent account number cannot be the same as the subsidiary account number.
6. Loops must not be introduced. Loops can cause lower-level dollar amounts to roll up into summary more than once.
7. Parent accounts can be changed. If postings have been made, and the parent account is already a summary account, then the program unhooks the tree from the account you are changing down the entire structure, hooks up the entire tree to the new parent account, and adjusts all the balances of the parent accounts up the chain.
8. A new summary account cannot use an existing detail account as a parent account. The detail cannot be transferred to a summary account; it must be transferred to a detail account.
9. A suggested use of parent summary accounts is to summarize all balance sheet accounts to a control balance sheet account. First, summarize all income and expense accounts to a projected profit account. Then, summarize the control balance sheet account and the projected profit to a zero balance control account. Within the system, the Financial Reports Generator and program GLRI, ROA Inquiry, use the summary accounts along with many other inquiries.
10. An account can only have a summary account once as a parent. For example, suppose that account number 100-80000-00-000 is a child of account number 100-90000-00-000-000, and account number 100-90000-00-000 is a child of account number 100-11000-00-000-000. You cannot add account number 100-80000-00-000 as a direct child of account number 100-11000-00-000, because it is already a descendent of the account via account number 100-90000-00-000.
If you are adding a new detail account or updating an existing detail account, and the new parent account is a detail account, then an Alert with the message "Converting a detail account to a summary account may take awhile. Reverting this operation will take just as long." is displayed. The parent account is then changed from a detail account to a summary account, and its balances from the start of time to the end of the ledger are copied to the new or changed detail account. Every mention of the parent account in journals, parameter files, sub-ledgers, historical tables is then changed to the new or changed detail account.
You cannot assign a detail account to be the parent of a summary account. You cannot update an existing summary account if the new parent account is a detail account.
The currency gain loss account is a detail account to post currency variances between the local currency and the account's alternate currency. You can only enter currency gain/loss accounts for detail accounts for which an alternate currency code has been entered. You cannot enter currency gain/loss accounts for summary accounts or for accounts entered in the consolidated enterprise.
If a journal is posted to the general ledger in alternate currency, lines will be added to the journal containing the gain/loss currency account that is assigned to each of the general ledger accounts to which amounts are being posted. These lines will contain the difference in the debits and credits posted in the alternate currency and the local currency. If there is no difference, the currency gain/loss account will not have an amount posted to it.
Currency gain/loss accounts postings are made in the local currency. This addition occurs when the actual posting occurs with program GLJP, General Ledger Journal Transaction Posting.
The elimination account is used for inter-company sales/purchases during consolidation. When you perform consolidation, it generates an elimination, where the balance at the end of the period in the subsidiary enterprise is transferred to the elimination account in the consolidation enterprise.
Automatic undefined segments must have an existing template account number. For example, if the automatic undefined segment of an account number consists of the last three characters in the account number, the account number 200-10000-00-342 must have the template account of 200-10000-00-000. The reason is that the information for the automatic undefined segments is taken from the template. The consolidation account is also included in this information.
When you create a template for the automatic undefined segment, include a consolidation account number. When the new automatic undefined segment is created, that account number will be copied into the new account's information and when consolidation occurs, it will be posted to that account. The result of this is that all accounts created from the template accounts will be posted to the same consolidation account unless the consolidation account is manually changed. If you manually change the consolidation account for each new automatic undefined segment, you have two choices.
1. You can enter an account that already exists in the parent enterprise to which you are consolidating.
2. If the parent enterprise also has an automatic undefined segment, and if a template account exists for that segment (as earlier defined), you can enter a consolidation account with a matching value in the automatic undefined segment and when the accounts are consolidated, the new account will be created.
For example, suppose that your account number is 200-10000-00-342 with 342 as the undefined account segment. The consolidation account that was automatically entered when the account was created is unsatisfactory, so you change it. In the consolidation enterprise, the account structure is the same, with the last three digits as the automatic undefined account. So, you change the consolidation account to 900-10000-00-342. This account does not currently exist in the consolidation enterprise, but a template account in the form of 900-10000-00-000 does exist in the consolidation enterprise. When you run the consolidation program, the account will post to the newly created 900-10000-00-342 account in the consolidation enterprise.
If the consolidation enterprise does NOT have an automatic undefined segment, or if a template account does NOT exist for the account that you are consolidating, this will NOT work. In these circumstances, an existing account must be entered.
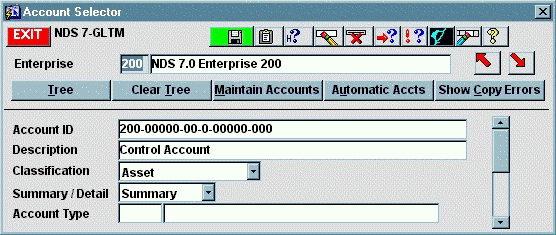
The Account Selector screen is the first screen displayed when the program is run.
From this screen, you can use the [Tree] button to view and maintain the account structure in a tree form.
You can display
multiple trees by selecting another account and pressing the [Tree]
button again. Each time the button is pressed, the tree structure
for the account will be added to the Navigator screen. To clear the
accounts from the Navigator screen, press [Clear Tree] or select the
tree and press the [Delete] ![]() button.
button.
Press the [Clear Tree] button to clear the Navigator screen of all tree structures currently displayed.
Press the [Maintain Accounts] button to maintain individual account information for the account in the lower block.
Press the [Copy Errors] button to copy and then view the errors created when an account was copied to another enterprise.
The [Automatic Accts] button generates the automatic undefined accounts that have not yet been entered in this program but exist in journals throughout the system.
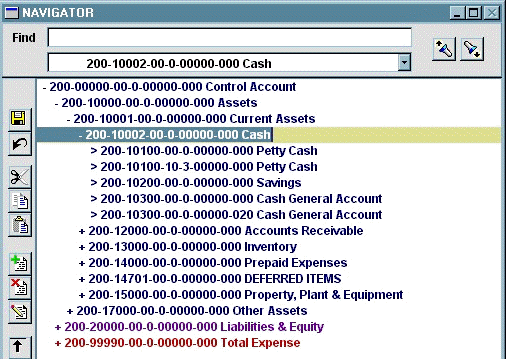
The Navigator screen is accessed with the [Tree] button. From this screen, you can view the chart of accounts in a tree form.
Accounts can be created and modified from this screen.
Different account types are displayed in different colors.
Asset accounts are blue.
Expense accounts are red.
Income accounts are black
Statistical accounts are green.
Liability and equity accounts are purple.
When an account is selected in the tree, it is highlighted. To select an account in this screen, click on it with your left mouse button.
Double-clicking on an account without a + or - in front of it will display the Account Detail screen.
Press the [Expand] ![]() button to expand the chart of accounts by one level for the selected account.
button to expand the chart of accounts by one level for the selected account.
Press the [Expand All] ![]() button to expand the entire tree.
button to expand the entire tree.
Press the [Collapse] ![]() button to collapse the tree below the selected account so that only the
selected account is displayed.
button to collapse the tree below the selected account so that only the
selected account is displayed.
Press the [Collapse All] ![]() button to
collapse the entire tree. This will collapse all accounts so that only
the account that was selected in the Account Selector screen is displayed.
button to
collapse the entire tree. This will collapse all accounts so that only
the account that was selected in the Account Selector screen is displayed.
Press the [Clear Tree] button on the Account Selector screen to clear the currently displayed trees from the Navigator screen.
Select the tree that you wish to remove from the Navigator
screen and press the [Delete] ![]() button.
button.
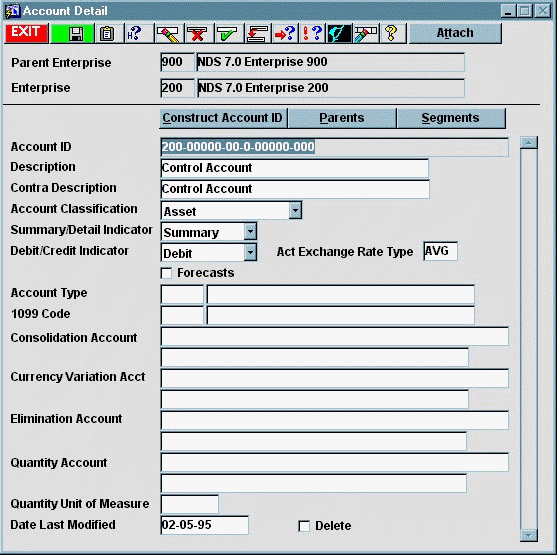
The Account Detail screen is accessed with the [Modify]
![]() button, with the [Create]
button, with the [Create]
![]() button, and with the [Maintain Accounts]
button on the Account Selector screen. The Account Detail screen can also
be opened by double-clicking on an account without a = or - in front of
it on the Navigation screen.
button, and with the [Maintain Accounts]
button on the Account Selector screen. The Account Detail screen can also
be opened by double-clicking on an account without a = or - in front of
it on the Navigation screen.
This screen contains the account information.
1. If you are creating an account with defined segments, verify that the defined segment values that you will be using in your new account exist in program GMSM, Maintain Segment Values. If the values do not exist, create them. Go to program GLTM, Account Maintenance, to create the new account.
2. The program opens in query mode in the Account Selector screen. Enter the enterprise for which you are maintaining accounts, and press [Execute Query].
3. Go to the lower block of the Account Selector screen. Query the account that will be the parent account for the new account and press the [Tree] button.
You can display the entire tree for the enterprise by pressing the [Tree] button after querying the enterprise. Then expand the tree and find the appropriate account number.
4. In the Tree Navigator screen, highlight the
parent account by clicking on it with your left mouse button. Press the
[Create] ![]() button.
button.
5. The words 'New Entry' will be displayed below the parent account. This is the location in the chart of accounts to which the account will be added. The Account Detail screen will be displayed with the parent account in the Account ID field.
6. In the Account Detail screen, the parent account is currently displayed. Press the [New Record] button.
7. In the Account ID field, enter the new account number.
You can enter the account number by segments with the [Construct Account ID] button.
For each segment number enter the segment value. You can use the list of values to select from segment values entered in program GMSM, Maintain Segment Values.
Enter the value description for each segment number. The value description defaults to the segment description from program GMSM, Maintain Segment Values.
When you have finished entering the value and value descriptions for the segments, press [Return]. The new account number will be entered on the Account Detail screen in the Account ID field.
8. In the Description field, enter the account description.
If you do not enter an account description, the account segment description will be copied from program GMSM, Maintain Segment Values, as the description.
9. In the Contra Description field, enter the contra description for the account.
In the financial statement reports, when a result is calculated and it comes out opposite of what you expect, for example, negative instead of positive, this is the description displayed for the account.
For example, the contra description of the Net Profit account might be Net Loss.
10. Set the Account Classification pop-list to the desired setting for this account. Choices are:
Asset
Liability
Income
Expense
Equity
Statistical
Intangibles
Asset, Liability, Income, Expense, and Equity accounts are the traditional account classifications derived from the accounting equation.
Intangibles may relate to an asset or expense account.
Statistical may relate to any of the other classifications above. Statistical accounts do not require balancing entries.
You must enter at least one income account and at least one expense account, and enter a retained earnings account in program GMEM, Enterprise Maintenance, before postings are made to the general ledger. Otherwise, problems will occur.
11. Set the Summary/Detail Indicator pop-list to the desired setting.
Set this pop-list to Summary if the account that you are entering is a parent or summary account.
Set this pop-list to Detail if the account is detail or posting account. Postings can only be made to Detail accounts. If you have parent enterprises set up, detail accounts must have consolidation accounts entered.
12. Set the Debit/Credit Indicator pop-list to the desired setting to indicate whether the accounts natural state is debit or credit.
This flag is used by the budget and forecast programs to determine whether the amount entered is recorded as a positive or a negative.
Asset and Expense accounts are normally considered debit accounts.
Liability, Equity, and Income are normally considered credit accounts.
13. Set the Forecasts flag to the desired setting.
If this flag is set to on, forecasts can be created for this account with program GLCF, Create New Forecasts.
If this flag is set to off, forecasts will not be created for this account with program GLCF, Create New Forecasts.
14. In the Alt Currency Cd field, enter the alternate currency code for the detail account, if it differs from the Local currency for the financial enterprise in which you are entering this account.
The field defaults to the local currency code for new accounts.
The local currency code is defined as the currency code assigned to the country code that is assigned to the financial enterprise in program GMEM, Enterprise Maintenance.
You cannot enter an alternate currency code for summary accounts and for accounts entered in consolidated enterprises.
You cannot change the currency code for the account if it has been assigned to a general ledger distribution code in program GLDM, Distribution Code Maintenance.
15. In the Exchange Rate Type pop-list, select the currency exchange rate type to be used for actual postings when the alternate currency code assigned to the account differs from the local currency code. Choices are:
The setting of the pop-list defaults to the system default in the Default Exchange Rate Type pop-list in program SPAP, System Parameters/Accounting Parameters.
Monthly Average: The average for the month, calculated by dividing the sum of the rates by the number of rates entered. This provides a true average only if you enter rates for every day in the month.
Daily Rate: The daily rate from program GLDX, Daily Exchange Rate Maintenance.
Prev Year Spot: The last spot rate reported in the previous year.
Spot Rate: The latest (chronologically) rate reported.
Exchange rate codes are entered in program GLFRC, Financial Rate Code Maintenance. Any additional Currency type exchange rate codes entered in program GLFRC, Financial Rate Code Maintenance, will also be displayed with this pop-list for selection.
16. In the Account Type field, enter the account type, if desired.
Account types are user-defined codes and can be used to sort data for custom reports.
Account Types are entered in program GLAT, Account Type Maintenance.
17. If the account is a 1099 account, enter the 1099 code in the 1099 Code field.
The 1099 code field accepts federal 1099 codes from program AP99, AP 1099 Codes.
1099 data will only be recorded for accounts payable invoices posted to accounts with a 1099 code indicator.
This code activates 1099 data being collected for any values posted to this account in accounts payable for vendors with 1099 flag on.
18. If you are using consolidation enterprises, and you are entering a detail account, enter the consolidation account in the parent enterprise for this account.
Consolidation accounts must exist for all detail accounts in the local enterprise before consolidation can occur.
19. If you entered an alternate currency code for this account in the Alt Currency Cd field, enter the currency variation account in the Currency Gain/Loss Acct field.
The account entered here is a detail account to post currency variances between the local currency and the account's alternate currency.
For more information, see the Currency Gain/Loss Account*Currency_Variation_Accounts section.
20. If you are using consolidation enterprises, you can enter an elimination account in the Sales Elimination Account field.
The elimination account to be used for inter-company sales/purchases during consolidation.
When you consolidate enterprises, it generates an elimination where the balance at the end of the period in the subsidiary enterprise is transferred to the elimination account in the consolidation enterprise.
21. In the Quantity Account field, enter the statistical account used to track quantities for this account, if desired.
22. In the Quantity Unit of Measure field, enter quantity unit of measure that the statistical account tracks, if desired.
23. In the Budget Rate Code pop-list, if general ledger budgets will be entered for this account, select the budget rate code to be used.
The initial setting of the pop-list defaults from program SPAP, System Parameters/Accounting Parameters.
All Budget type exchange rate codes entered in program GLFRC, Financial Rate Code Maintenance, are displayed in this pop-list for selection.
24. In the Forecast Rate Code pop-list, if general ledger forecasts will be entered for this account, select the forecast rate code to be used.
The initial setting of the pop-list defaults from program SPAP, System Parameters/Accounting Parameters.
All Forecast type exchange rate codes entered in program GLFRC, Financial Rate Code Maintenance, are displayed in this pop-list for selection.
25. Press [Commit].
26. Press the [Attach] button to add the account
to the parent account. It will be added where the words 'New Entry' are
displayed on the chart of accounts tree. Press the [Save] ![]() button.
button.
1. If you are creating an account with defined segments, verify that the segment values that you will be using in your new account exist in program GMSM, Maintain Segment Values. If the values do not exist, create them. Go to program GLTM, Account Maintenance, to create the new account.
2. The program opens in query mode in the Account Selector screen. Enter the enterprise for which you are maintaining accounts, and press [Execute Query].
3. Press the [Maintain Accounts] button. This will open the Account Detail screen.
4. In the Account Detail screen, an existing account is currently displayed. Press the [New Record] button.
5. In the Account ID field, enter the new account number.
You can enter the account number by segments with the [Construct Account ID] button.
For each segment number enter the segment value. You can use the list of values to select from segment values entered in program GMSM, Maintain Segment Values.
Enter the value description for each segment number. The value description defaults to the segment description from program GMSM, Maintain Segment Values.
When you have finished entering the value and value descriptions for the segments, press [Return]. The new account number will be entered on the Account Detail screen in the Account ID field.
6. In the Description field, enter the account description.
If you do not enter an account description, the account segment description will be copied from program GMSM, Maintain Segment Values, as the description.
7. In the Contra Description field, enter the contra description for the account.
In the financial statement reports, when a result is calculated and it comes out opposite of what you expect, for example, negative instead of positive, this is the description displayed for the account.
For example, the contra description of the Net Profit account might be Net Loss.
8. Set the Account Classification pop-list to the desired setting for this account. Choices are:
Asset
Liability
Income
Expense
Equity
Statistical
Intangibles
Asset, Liability, Income, Expense, and Equity accounts are the traditional account classifications derived from the accounting equation.
Intangibles may relate to an asset or expense account.
Statistical may relate to any of the other classifications above. Statistical accounts do not require balancing entries.
You must enter at least one income account and at least one expense account, and enter a retained earnings account in program GMEM, Enterprise Maintenance, before postings are made to the general ledger. Otherwise, problems will occur.
9. Set the Summary/Detail Indicator pop-list to the desired setting.
Set this pop-list to Summary if the account that you are entering is a parent or summary account.
Set this pop-list to Detail if the account is detail or posting account. Postings can only be made to Detail accounts. If you have parent enterprises set up, detail accounts must have consolidation accounts entered.
10. Set the Debit/Credit Indicator pop-list to the desired setting to indicate whether the accounts natural state is debit or credit.
This flag is used by the budget and forecast programs to determine whether the amount entered is recorded as a positive or a negative.
Asset and Expense accounts are normally considered debit accounts.
Liability, Equity, and Income are normally considered credit accounts.
11. Set the Forecasts flag to the desired setting.
If this flag is set to on, forecasts can be created for this account with program GLCF, Create New Forecasts.
If this flag is set to off, forecasts will not be created for this account with program GLCF, Create New Forecasts.
12. In the Alt Currency Cd field, enter the alternate currency code for the detail account, if it differs from the Local currency for the financial enterprise in which you are entering this account.
The field defaults to the local currency code for new accounts.
The local currency code is defined as the currency code assigned to the country code that is assigned to the financial enterprise in program GMEM, Enterprise Maintenance.
You cannot enter an alternate currency code for summary accounts and for accounts entered in consolidated enterprises.
13. In the Exchange Rate Type pop-list, select the currency exchange rate type to be used for actual postings when the alternate currency code assigned to the account differs from the local currency code. Choices are:
The setting of the pop-list defaults to the system default in the Default Exchange Rate Type pop-list in program SPAP, System Parameters/Accounting Parameters.
Monthly Average: The average for the month, calculated by dividing the sum of the rates by the number of rates entered. This provides a true average only if you enter rates for every day in the month.
Daily Rate: The daily rate from program GLDX, Daily Exchange Rate Maintenance.
Prev Year Spot: The last spot rate reported in the previous year.
Spot Rate: The latest (chronologically) rate reported.
Exchange rate codes are entered in program GLFRC, Financial Rate Code Maintenance. Any additional Currency type exchange rate codes entered in program GLFRC, Financial Rate Code Maintenance, will also be displayed with this pop-list for selection.
14. In the Account Type field, enter the account type, if desired.
Account types are user-defined codes and can be used to sort data for custom reports.
Account Types are entered in program GLAT, Account Type Maintenance.
15. If the account is a 1099 account, enter the 1099 code in the 1099 Code field.
The 1099 code field accepts federal 1099 codes from program AP99, AP 1099 Codes.
1099 data will only be recorded for accounts payable invoices posted to accounts with a 1099 code indicator.
This code activates 1099 data being collected for any values posted to this account in accounts payable for vendors with 1099 flag on.
16. If you are using consolidation enterprises, and you are entering a detail account, enter the consolidation account in the parent enterprise for this account.
Consolidation accounts must exist for all detail accounts in the local enterprise before consolidation can occur.
17. If you entered an alternate currency code for this account in the Alt Currency Cd field, enter the currency variation account in the Currency Gain/Loss Acct field.
The account entered here is a detail account to post currency variances between the local currency and the account's alternate currency.
For more information, see the Currency Gain/Loss Account*Currency_Variation_Accounts section.
18. If you are using consolidation enterprises, you can enter an elimination account in the Sales Elimination Account field.
The elimination account to be used for inter-company sales/purchases during consolidation.
When you consolidate enterprises, it generates an elimination where the balance at the end of the period in the subsidiary enterprise is transferred to the elimination account in the consolidation enterprise.
19. In the Quantity Account field, enter the statistical account used to track quantities for this account, if desired.
20. In the Quantity Unit of Measure field, enter quantity unit of measure that the statistical account tracks, if desired.
21. In the Budget Rate Code pop-list, if general ledger budgets will be entered for this account, select the budget rate code to be used.
The initial setting of the pop-list defaults from program SPAP, System Parameters/Accounting Parameters.
All Budget type exchange rate codes entered in program GLFRC, Financial Rate Code Maintenance, are displayed in this pop-list for selection.
22. In the Forecast Rate Code pop-list, if general ledger forecasts will be entered for this account, select the forecast rate code to be used.
The initial setting of the pop-list defaults from program SPAP, System Parameters/Accounting Parameters.
All Forecast type exchange rate codes entered in program GLFRC, Financial Rate Code Maintenance, are displayed in this pop-list for selection.
23. Press [Commit]. You have created a new account. Accounts can be created but not displayed in the chart of accounts. These accounts have no parents.
1. From the Account Selector screen, in the lower block, select the account that will be the parent account for the existing account and press the [Tree] button.
You can display the entire tree for the enterprise by pressing the [Tree] button after querying the enterprise. Then expand the tree and find the appropriate account number.
2. Highlight the parent account by clicking
on it with your left mouse button. Press the [Create] ![]() button.
button.
3. The words 'New Entry' will be displayed below the parent account. This is the location in the chart of account to which the account will be added. The Account Detail screen will be displayed with the parent account in the Account ID field. Query the account that you want to add to the chart of accounts.
4. Press the [Attach] button to add the account
to the parent account. It will be added where the words 'New Entry' are
displayed on the chart of accounts tree. Press the [Save] ![]() button.
button.
5. You can view an account's parent account with the [Parents] button on the Account Detail screen.
1. To add an additional parent using the chart of accounts, from the Account Selector screen, query the desired account number and press the [Tree] button.
2. Highlight the desired subsidiary account by clicking on it with your left mouse button.
3. Press the [Copy] ![]() button.
button.
4. Return to the Account Selector screen and query the parent account number that you are assigning to the account.
5. Press the [Tree] button.
6. Highlight the parent account number. Press
the [Paste] ![]() button. The account
will be added below the selected parent account. Press the [Save]
button. The account
will be added below the selected parent account. Press the [Save] ![]() button.
button.
7. You can view the parent accounts for an account with the [Parents] button on the Account Detail screen.
1. To un-assign a parent account using the chart of accounts, from the Account Selector screen, query the parent account that you will be un-assigning from the account.
2. Press the [Tree] button. Expand the tree for the parent account.
3. Find and highlight the account from which you are un-assigning the parent account.
4. Press the [Delete] ![]() button. This will un-assign the parent account from the account. This
does not delete the account from
the system.
button. This will un-assign the parent account from the account. This
does not delete the account from
the system.
5. Press the [Save] ![]() button.
button.
There are two provisions for copying a tree of accounts between enterprises. Both the enterprise from which you are copying and the enterprise to which you are copying must have the same account number structure in program GMDS, Define GL Structure, and the user ID of the person copying the tree must be authorized access to both enterprises.
This includes account segment descriptions.
Copying accounts in this program differs from copying accounts in program GLLC, Account Number Copy, or program GLSC, Account Number Copy by Segment.
In program GLSC, Account Number Copy by Segment, and program GLLC, Account Number Copy, when accounts are copied, if the copied range of accounts contains a reference to an account that exists outside the selected range, the program will create the account in the copy to enterprise.
In program GLTM, Account Maintenance, when the tree structure contains a reference to an account that exists outside the selected tree structure, the program will make the copied account reference null in the copy to enterprise.
1. Highlight the desired account in the Navigator
screen. This account should be the highest level account in the tree structure
that you wish to copy. Press the [Copy] ![]() button.
button.
2. Go to the Account Selector screen and query the enterprise to which you are copying the tree of accounts.
3. Query the account to which you are attaching the tree structure. Press the [Tree] button. Highlight the account to which you will be attaching the tree.
4. Press the [Paste] ![]() button
to attach the copied account. The program will ask you if you want to
copy only the single account or the account and all of its children.
button
to attach the copied account. The program will ask you if you want to
copy only the single account or the account and all of its children.
5. Press [Commit], and the chart has been copied successfully. Sometimes there are error messages in copying accounts between enterprises. If an error occurs, a warning message will be displayed, and the error can be viewed with the [Copy Errors] button.
Press this button to attach this account to the chart of accounts, in the location that reads 'New Entry.' See Creating New Accounts (and assigning parents at the same time).
Press this button to view and maintain the accounts with an Automatic Undefined segment that have not yet been posted.
Press this button to collapse one level of accounts below the selected account so that only the selected account is showing.
Press this button to collapse all levels of accounts below the selected accounts so that only the selected account is displayed.
Press this button to construct an account identifier by segment. If the new account number duplicates an existing account number, and you try to exit the screen, you will receive a warning that states 'Account number must be unique. Return without saving?'. If the segment is a Defined segment, and you enter a value that has not been defined in program GMSM, Maintain Segment Values, you will receive a warning that states 'Account number contains invalid segment values. Return without saving?'. The value description field will also display the words Invalid Segment.
Press this button to copy the information for the selected account and move the copied information to a temporary file.
Press this button to view the errors created when an account or an account tree was copied from one enterprise to another.
Press this button to create a new account in or add a new account to the selected location in the chart of accounts.
Press this button to make the accounts that have not yet been posted into accounts in the chart of accounts. This does not post the information that is assigned to the account in the system.
Press this button to remove the selected account from its current position and move it to a temporary file.
Press this button to delete an account from the chart of accounts. This does not delete the account from the system; the account is just removed from the displayed chart of accounts.
Press this button to display the accounts that are one level below the selected account.
Press this button to display all levels of accounts below the selected account.
Press this button to move down one page in the Navigator screen.
Press this button to move up one page in the Navigator screen.
Press this button to view and maintain individual account numbers, specifically the account that is visible in the lower block of the Account Selector screen.
Press this button to change the account information on the selected account. The Account Detail screen is displayed when this button is pressed.
Press this button to view the parent accounts for this account. To assign a parent account to an account, see Adding a Parent Account to an Existing Account and Assigning Multiple Parent Accounts to an Account.
Press this button to paste the information from the temporary file to the selected location in the chart of accounts.
Press this button to undo the last change you made to the chart of accounts. Only the last change will be undone, and you cannot undo a reversion.
Press this button to commit the chart of accounts.
Press this button to search forward in the chart of accounts for the information in the find box.
Press this button to view the segment information for the selected account number.
Press this button to view and maintain the tree structure of the general ledger chart of accounts.