Menu objects are used to define the menu structure of the Xephr® entities and are used during runtime to allow access to the entities that have been created. There are three types of menu objects: menus, menu links, and entity menus.
Menus ![]() are the top level objects, containing menu
links, both of which are displayed in the menu object tree in the Explorer
Tree.
are the top level objects, containing menu
links, both of which are displayed in the menu object tree in the Explorer
Tree.
Menu links define the entity/menu
that the link will run and have icons that represent the type of entity
or menu. ![]()
![]()
![]()
![]()
![]()
![]()
Entity menus ![]() are displayed as a child of the entity object
to allow you to view the entity's menu links during maintenance of the
entity itself. Entity menus are basically the same thing as menu
links, except that they are displayed with the entity instead of with
the menu. Entity menus cannot be maintained. In order to maintain
an entity's menu links, you must find the menu link in the Menu Information
section.
are displayed as a child of the entity object
to allow you to view the entity's menu links during maintenance of the
entity itself. Entity menus are basically the same thing as menu
links, except that they are displayed with the entity instead of with
the menu. Entity menus cannot be maintained. In order to maintain
an entity's menu links, you must find the menu link in the Menu Information
section.
Entities can be run from their menu links. For more information, see the Running Entities from Xephr Studio section.
Menu objects reference both entities and other menu objects. Within the Xephr Studio, the menu objects are displayed in the same hierarchy in which the runtime will display the selections.

The top-level parent menus are displayed at the first level below the Menu Information object. These are menus that are not assigned to be displayed on any other menu. Normally, top level menus are those that are displayed to users when they log in.
Beneath the top-level parent menus are additional menus and menu links. Menu links that go to entities will display the icon for the entity. Menu links that go to other menus display the menu icon and can be expanded to view the menus and menu links assigned to them.
Runtime menus mimic the menu hierarchy set up in the Menu Information section of the Xephr studio. There are two ways to reference menus during runtime, cascading menus and standard blocks set up to use the Xephr menu datasource.
When using cascading menu blocks during runtime, the cascading menu displays all of the menus and their menu entries starting with the defined menu root in a single block. For more information, see the Cascading Menus section.
When using a standard block that references the Xephr menu datasource, the root menu is defined according to a global value assigned to the user. The navigation through the menu hierarchy is then controlled by resetting that global value and refreshing the screen in the browser. For more information, see the Xephr Menu Service for Standard Blocks section.
Entity menus are located under each entity, and define the menus that contain links to the entity. Entities can have multiple entity menus.
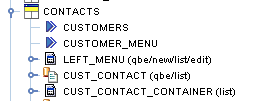
In this example, the CONTACTS entity contains one entity menu for the CUSTOMERS menu and one entity menu for the CUSTOMERS_MENU menu. These links cannot be maintained here. In order to maintain an entity's menu links, you must find the menu link in the Menu Information section. Entity menu objects are created when the user either right clicks on the entity and selects Add to Menu, or when the user adds a menu link to a menu in the Menu Information section.
In the Explorer Tree, expand the Menu Information object to display all of the menus that have been created. Expand and select the menu in which you are creating a new menu.
Right click on the selected menu to display the right-click menu. Hold your cursor over the New option, and when the sub-menu is displayed, drag your cursor over either the Menu option.
The new menu will be added to the tree in green, and
the property sheet is displayed for you to define the menu. Menu
properties will either be displayed in Alphabetical or Logically, depending
on the setting of the [Sort Alphabetically/Logically] ![]() button. The following instructions
are assuming that the properties are sorted logically.
button. The following instructions
are assuming that the properties are sorted logically.
In the Menu Name property, enter the name of the new menu.
In the Description property, enter the user-defined description for the menu.
In the Z Order property, enter the numeric value that indicates in what order this menu will be displayed on its parent menu during runtime.
In the Display Text property, enter the text that will be displayed as the link to this menu on the parent menu.
In the New Window property, select true or false to indicate whether this menu will be opened in a new window when selected on the parent menu. When set to true, it indicates that when the menu is selected during runtime, it will be displayed in a new window. When set to false, it indicates that the menu will be displayed in the current window. Generally, this pop-list should be set to false for menus.
When all changes have been made, press the [Save] ![]() button in the Main
Toolbar.
button in the Main
Toolbar.
In the Explorer Tree, expand the Menu Information object to display all of the menus that have been created. Expand and select the menu in which you are creating a new menu link.
Right click on the selected menu to display the right-click menu. Hold your cursor over the New option, and when the sub-menu is displayed, drag your cursor over either the Menu Link option.
The new menu link will be added to the tree in green,
and the property sheet is displayed for you to define the menu link.
Menu properties will either be displayed in Alphabetical or Logically,
depending on the setting of the [Sort Alphabetically/Logically] ![]() button. The following instructions
are assuming that the properties are sorted logically.
button. The following instructions
are assuming that the properties are sorted logically.
In the Entity property, select the name of the entity that will be opened when this menu link is selected.
In the Z Order property, enter the numeric value that indicates in what order this menu link will be displayed on its parent menu during runtime.
In the Display Text property, enter the text that will be displayed as the link to this entity on the parent menu.
In the New Window property, select true or false to indicate whether this entity will be opened in a new window when selected on the parent menu. When set to true, it indicates that when the entity is selected during runtime, it will be displayed in a new window. When set to false, it indicates that the entity will be displayed in the current window.
When all changes have been made, press the [Save] ![]() button in the Main
Toolbar.
button in the Main
Toolbar.
In the Explorer Tree, expand the Group Information objects until you can select the entity that you wish to add to a menu.
Right click on the entity and select Add To Menu
The Create New Menu Link screen will be displayed for you to select the parent menu for the entity.
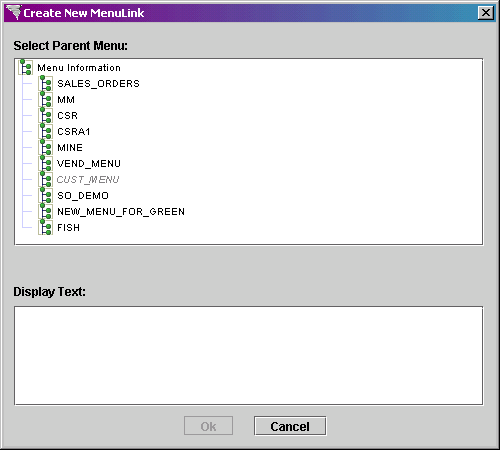
Menus to which the entity has already been added will be grayed out.
You can expand a menu to display the menus assigned to it by clicking on the menu in the upper portion of this screen.
Click on a menu to select it.
Enter the text to display as the link in the Display Text field.
Click on the Ok button at the bottom of the screen.
The menu link and entity menu have been created.
You cannot modify entity menus. In order to change any settings for the entity menu, you must modify the menu link in the Menu Information section.
Xephr is a registered trademark of NDS Systems, LC.
Copyright © 2007 NDS Systems LC.