The Xephr
The console has four tabs: Configuration, License, Repositories, and Hosts. You can click on the Close button at any time to close the Xephr Administration Console.
Xephr is a registered trademark of NDS Systems, LC.
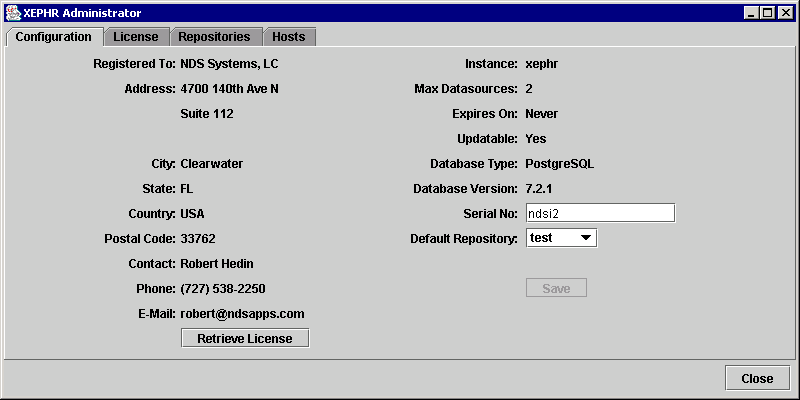
On the Configuration tab, the following information can be viewed and/or maintained:
Registered To: The name of the company to which the Xephr install is registered. This information is obtained from the NDS Corporate database during install, using the serial number provided.
Address: The address lines for the company to which the Xephr install is registered. This information is obtained from the NDS Corporate database during install, using the serial number provided.
City: The city for the company to which the Xephr install is registered. This information is obtained from the NDS Corporate database during install, using the serial number provided.
State: The state for the company to which the Xephr install is registered. This information is obtained from the NDS Corporate database during install, using the serial number provided.
Country: The country for the company to which the Xephr install is registered. This information is obtained from the NDS Corporate database during install, using the serial number provided.
Postal Code: the zip code or postal code for the company to which the Xephr install is registered. This information is obtained from the NDS Corporate database during install, using the serial number provided.
Contact: the primary contact for the company to which the Xephr install is registered. This information is obtained from the NDS Corporate database during install, using the serial number provided.
Phone: the primary phone number for the company to which the Xephr install is registered. This information is obtained from the NDS Corporate database during install, using the serial number provided.
Email: the email address for the primary contact for the company to which the Xephr install is registered. This information is obtained from the NDS Corporate database during install, using the serial number provided.
Instance: the name of the Xephr instance, assigned during installation.
Max Datasources: the maximum number of datasources allowed for this install of Xephr. This number is obtained from the NDS Corporate database for the serial number provided for the Xephr install.
Expires On: the date on which this installation expires. This property is only used for evaluation installs and is obtained from the NDS Corporate database for the serial number provided for the Xephr install.
Updatable: Indicates whether this version permits target datasources to be updated or not. For installations that are read only (such as reporting only solutions), this property will be set to No. For installations that are fully transaction capable, this property will be set to Yes.
Database Type: Indicates the type of database containing the Xephr repository.
Database Version: Indicates the version of the database containing the Xephr repository.
Serial No: contains the serial number provided during installation. When you updated the serial number, save, and click Retrieve License, the serial number validation checks the serial number entered with the NDS Xephr web service to retrieve the customer's information from the NDS Corporate database to generate the Xephr master record. Without an internet connection, this validation will not occur.
Default Repository: the name of the default repository for this Xephr install. It defaults to the repository set up during installation. If additional repositories are created on the Repository tab, then those can be selected here as well.
You can only change the values for the Serial No property and the Default Repository property.
When all changes have been made, click on the Save button to save the changes.
To update the company information and license, click on the Retrieve License button. You should be connected to the internet when you click on this button so that the Xephr web service can retrieve the information from the NDS Corporate database.
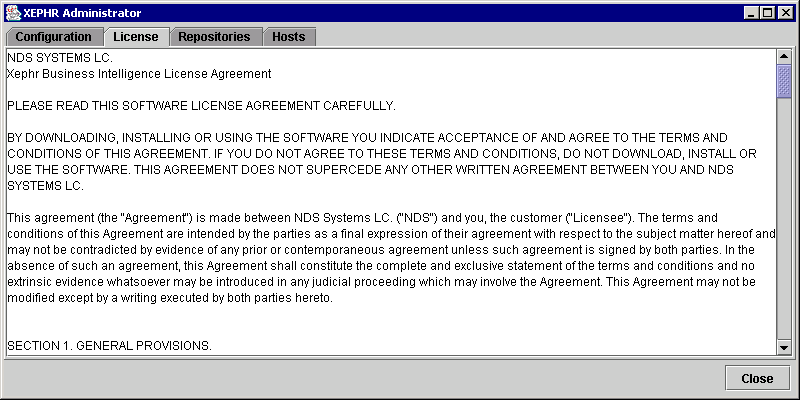
The NDS Xephr Software License Agreement is displayed on this tab.
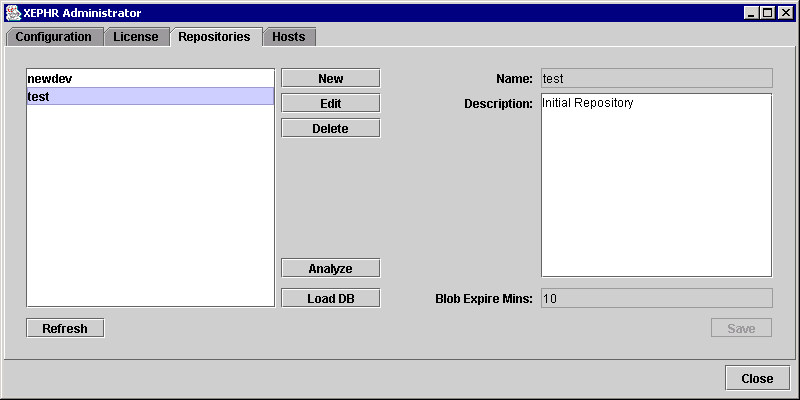
On the Repositories Tab, you can view, create, modify, and delete Xephr repositories in the PostgreSQL database. The repository created when installing Xephr is displayed with the description Initial Repository and can be edited.
In the section on the left of the screen, all repositories are displayed. To select a repository, left click on the repository name.
When a repository is selected, the repository name, description, and Blob Expire Mins are displayed on the right.
Click on the Refresh button at any time to refresh the information displayed on this tab.
See Also: Xephr Repository and Xephr Hosts and Repositories
Select the repository to maintain on the left of the screen.
Click on the Edit button.
The properties on the right become editable.
In the Description property, modify the description for the repository.
In the Blob Expire Mins property, change the number of minutes that generated binary objects, such as graphics and pdf's are retained in the repository.
When all changes have been made, click on the Save button.
Click on the New button.
The properties on the right become editable.
In the Name property, enter the name of the new repository.
In the Description property, enter the description for the new repository.
In the Blob Expire Mins property, enter the number of minutes that generated binary objects, such as graphics and pdf's are retained in the repository.
When all properties have been entered, click on the Save button.
Select the repository to delete on the left of the screen.
Click on the Delete button.
A message asking you to confirm the delete will be displayed. Click on the Ok button to delete the repository.
You will be informed that the action is irreversible. Click on the Ok button to delete the repository.
The repository will be deleted.
Analyzing the repository validates the data within and optimizes the performance of the repository.
Select the repository to analyze on the left of the screen.
Click on the Analyze button.
After a few moments, the analysis will be completed.
Select the repository to load on the left of the screen.
Click on the Load DB button.
The Server Identification screen will be displayed.
In the Username field, enter the user name for the database that you are loading.
In the Password field, enter the password for the database that you are loading.
In the Server field, enter the server name for the database that you are loading.
In the SID field, enter the service identifier (SID) for the database.
Click on the Execute button when all fields have been entered.
The conversion will be performed. Press Ok. The conversion is complete.
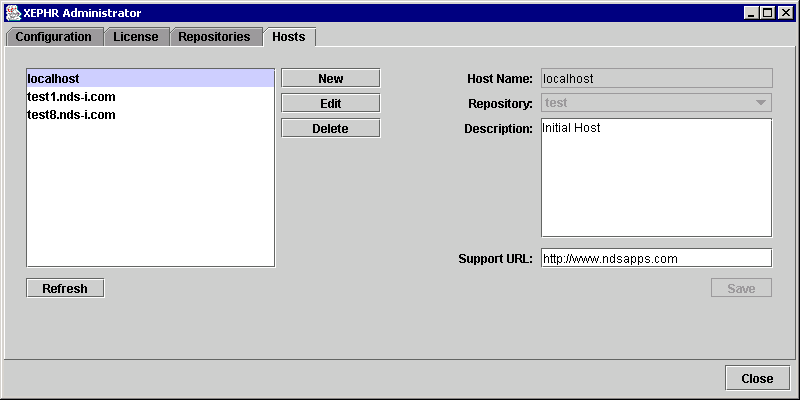
On the Hosts tab, you can view, modify, create, and delete Xephr hosts. Xephr hosts identify the connection string used in the web browser to connect the Xephr repositories in your PostgreSQL database. The host created when installing Xephr is displayed with the description Initial Host and can be edited here.
In the section on the left of the screen, all hosts are displayed. To select a host, left click on the host name.
When a host is selected, the host name, repository, description, and Support URL are displayed on the right.
Click on the Refresh button at any time to refresh the information displayed on this tab.
See Also: Xephr Hosts and Repositories
Select the host to maintain on the left of the screen.
Click on the Edit button.
The properties on the right become editable.
In the Repository property, select the repository used when connecting to this host.
In the Description property, modify the description for the host.
In the Support URL property, enter the URL to be displayed on the Support Pop-Up selected from the Help menu on the main toolbar in the Xephr Studio.
When all changes have been made, click on the Save button.
Click on the New button.
The properties on the right become editable.
In the Name property, enter the name of the new host.
In the Repository property, select the repository used when connecting to the new host.
In the Description property, enter the description for the new host.
In the Support URL property, enter the URL to be displayed on the Support Pop-Up selected from the Help menu on the main toolbar in the Xephr Studio.
When all properties have been entered, click on the Save button.
Select the host to delete on the left of the screen.
Click on the Delete button.
The host will be deleted.