List of Values Example
Lists of values need to be created before fields can be assigned lists
of values either as an option list or as a list of values type field.
The following examples include how to create a
simple list type list of values, a simple query type list of values, and a list of values
that populates other fields on the block.
See Also
Lists
of Values
List Type
The list of values for this example is a simple list defining vendor
status.
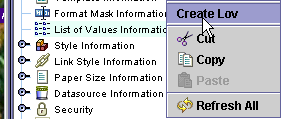
In the Explorer Tree, select the
List of Values Information object.
Right click on the object and select
Create Lov.
The Create LOV screen is displayed.
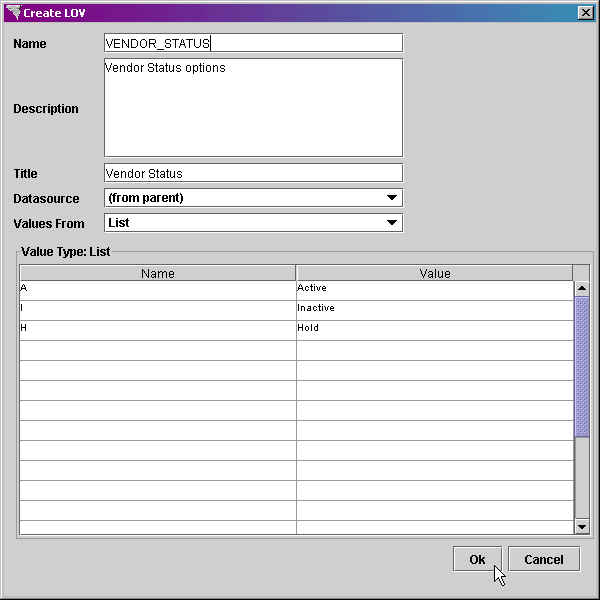
In the Name
property, enter VENDOR_STATUS.
In the Description
property, enter a description for the list of values, to indicate the
data that is selected by this list. In this example,
enter Vendor Status.
In the Title
property, enter Vendor Status. The title will be
displayed at the top of the list of values when it is activated.
Leave the Datasource
property set to (from parent).
In the Values
From pop-list, select List to
indicate that the values will be defined here in a list form.
In the Name
property, enter the database value for the entry in the list.
-
In the Value
property, enter the text that will be displayed to describe this value
in the list:
|
Name |
Value |
|
A |
Active |
|
I |
Inactive |
|
H |
Hold |
Click on the Ok
button at the bottom of the screen to create the list of values.
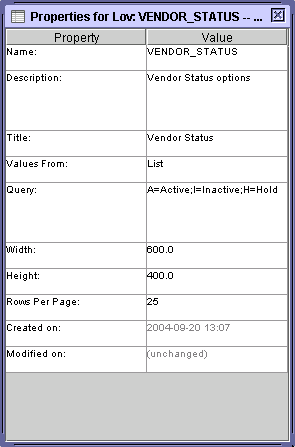
Press the Save
 button in the Main Toolbar
to save the list of values.
button in the Main Toolbar
to save the list of values.
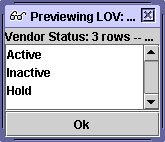
Press the Preview
 button in the main toolbar to view your new list of values. You
will only see the value that is displayed after the equal sign (=) in
the list of values.
button in the main toolbar to view your new list of values. You
will only see the value that is displayed after the equal sign (=) in
the list of values.
Query Type
The list of values for this example is a simple list including
the vendor number and name for active vendors.
In the Explorer Tree, select the
List of Values Information object.
Right click on the object and select
Create Lov.
The Create LOV screen is displayed.
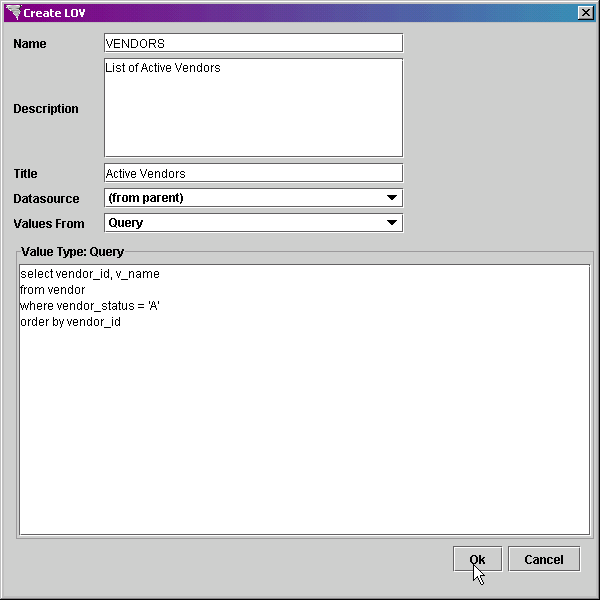
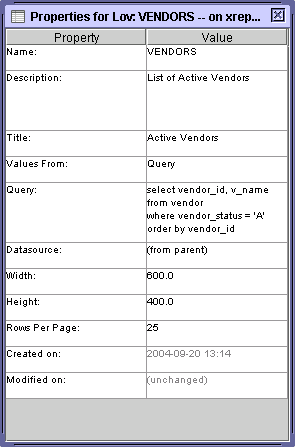
In the Name
property, enter VENDORS.
In the Description
property, enter List of Active Vendors, as the description to indicate
what the list should show.
In the Title
property, enter Active Vendors. The title will
be displayed at the top of the list of values when it is activated.
Leave the Datasource
property set to (from parent).
In the Values
From pop-list, select Query.
In the Query
property, enter the SQL select statement that will be executed against
the database to retrieve the values for the list.
The following select statement will select all of the vendor numbers
in the vendor table that are active, and the list is ordered by vendor
name. When a value is selected, the vendor number
will be inserted into the field on the screen. The
list will display the vendor number and vendor name, as those are the
columns defined to be selected from the database.
select vendor_id, (value
inserted into list of values field)
v_name (additional
field, value will be inserted into the v_name field if it exists)
from vendor
where vendor_status = 'A'
order by vendor_id
Queries are entered as follows:
SELECT (value), (additional
field) FROM (table) WHERE
(clause) ORDER BY (clause).
The first column (value) and
the second column (display value)
are differentiated by the comma.
The value is the database value
that will be obtained from the database, displayed in the list of values,
and inserted into the field when it is selected.
The display value
is an additional value text that will be displayed in the list
of values. The value may also be added to a field
of the same name. For more information, see the
Auto-Populating section.
The table is the database table
against which the statement will be executed to retrieve the values.
The where clause
restricts the information displayed in the list of values.
The order by
clause indicates the order in which the data will be sorted and
displayed.
Click on the Ok
button at the bottom of the screen to create the list of values.
Press the Save
button in the Main Toolbar
to save the list of values.
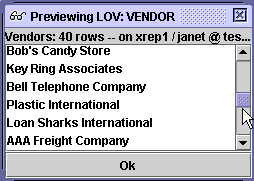
Press the Preview
button in the main toolbar to view your new list of values. You
will only see the value that is displayed after the first comma and before
the second comma in the list of values. In this
example, the vendor name.
Auto-Populating
The list of values for this example is a simple query for
the customer number and name for active customers. However,
this list of values will return values to multiple fields on the entity
as it is an auto-populating list of values. This
list will return the customer number to the field from which the list
is run, and customer name to the cust_name field on the screen.
For additional explanations on auto-populating lists of
values, see the Auto-Populating
Lists of Values section of the help.
In the Explorer Tree, select the
List of Values Information object.
Right click on the object and select
Create Lov.
The Create LOV screen is displayed.
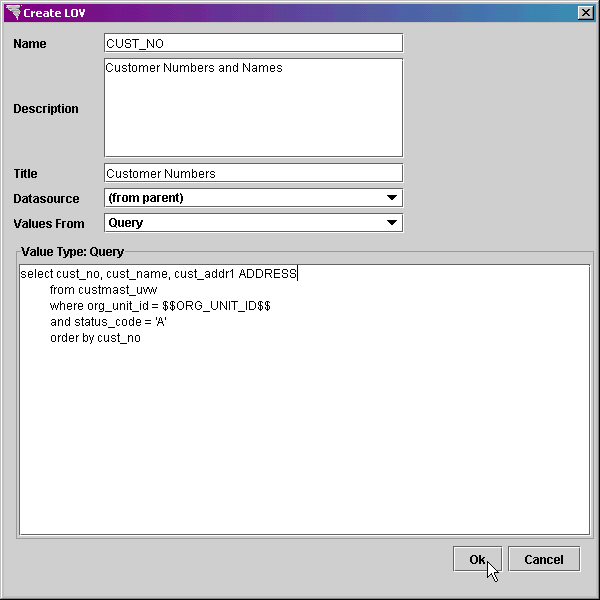
In the Name
property, enter CUST_NO.
In the Description
property, enter Customer Numbers and Names, as the description to indicate
what the list should show.
In the Title
property, enter Customer Numbers. The title will
be displayed at the top of the list of values when it is activated.
In the Values
From pop-list, select Query.
In the Query
property, enter the SQL select statement that will be executed against
the database to retrieve the values for the list. The
first column remains the code that will be returned to the field.
You can add additional columns to the select statement to return additional
values. Each additional column that is returned
must be unique and must match the field into which the additional value
will be inserted. Aliases can be used to guarantee
the match, and to insert expressions into the field.
You can add as many additional columns as you like.
The following select statement will select all of the
customer numbers in the custmast_uvw view that are active, and the list
is ordered by customer name. When a value is selected,
the customer number will be inserted into the field from which the list
was run, the customer name will be inserted into the cust_name field,
and the first line of the customer address will be inserted into the address
field. The list will display the customer number
and customer name.
select cust_no, (value
inserted into list of values field)
cust_name,
(additional value
displayed in list of values and inserted into cust_name field)
cust_addr1
ADDRESS (additional
value displayed in list of values and inserted into ADDRESS field)
from custmast_uvw
where
org_unit_id = $$ORG_UNIT_ID$$
and status_code
= 'A'
order
by cust_no
Auto-populating queries are entered
as follows:
SELECT (value),
(additional
field) FIELD_NAME,
(additional
field 2) FIELD_NAME2
FROM (table)
WHERE (clause)
ORDER BY (clause).
Database columns are separated by
commas within the select statement.
The field_name and field_name2 are optional aliases for the additional
fields. If the additional field names match the
name of the fields on the block, you do not have to alias them.
The value is the database value
that will be obtained from the database and inserted into the field when
it is selected.
The additional field is the
database value that will also be obtained from the database and inserted
into the matching field on the block when the value is selected.
The additional field 2 is the
database value that will also be obtained from the database and inserted
in the matching field on the block when the value is selected.
The table is the database table
against which the statement will be executed to retrieve the values.
The where clause
restricts the information displayed in the list of values.
The order by
clause indicates the order in which the data will be sorted and
displayed.
Click on the Ok
button at the bottom of the screen to create the list of values.
Press the Save
button in the Main Toolbar.
Press the Preview
button in the main toolbar to view your new list of values.
In the List
of Variables screen, since we defined this list of values to use
a global variable, we need to assign the value. In
the Value field, enter 100.
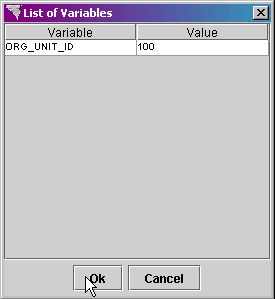
Click on the Ok
button.
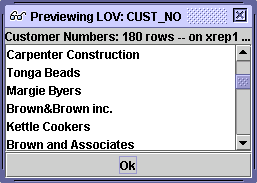
You will only see the value that
is displayed after the first comma and before the second comma in the
list of values. In this example, the customer name.
Xephr is a registered trademark of NDS Systems, LC.
Copyright © 2007 NDS Systems LC.