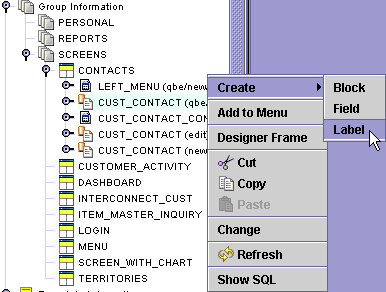
In the Explorer Tree, expand the Group Information object.
Expand the SCREENS group and then expand the CONTACTS screen to display all of the blocks.
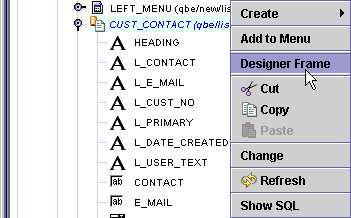
Right click on the CUST_CONTACT (qbe,list) block.
On the menu, select Create
-> Label.
The Adding Labels screen is displayed.
Press the Add button four times.
In the fields,
enter the following text:
COLUMN_SELECTOR
AVAILABLE
SELECTED
TITLE
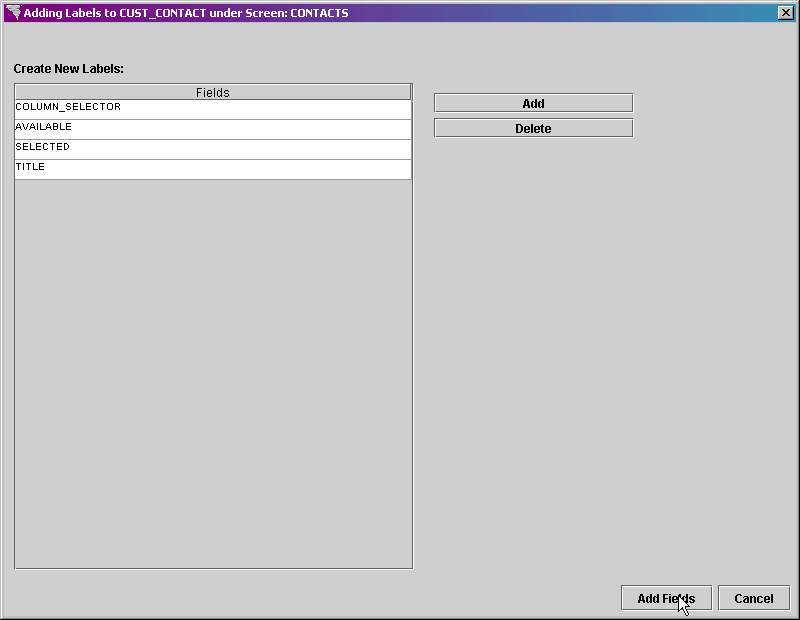
Click on the Add Fields button at the bottom of the screen.
The fields are added to the block.
Press the Save  button to save the new fields.
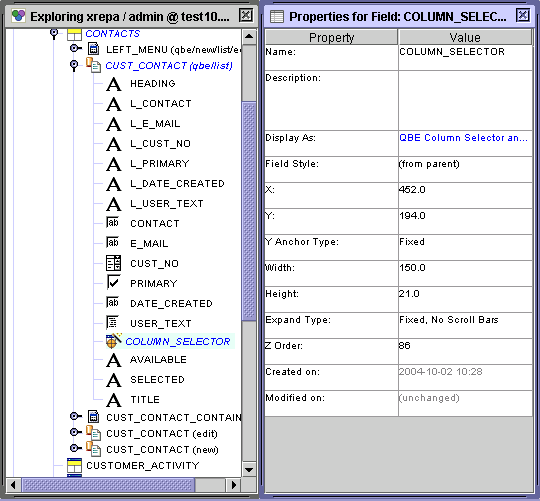
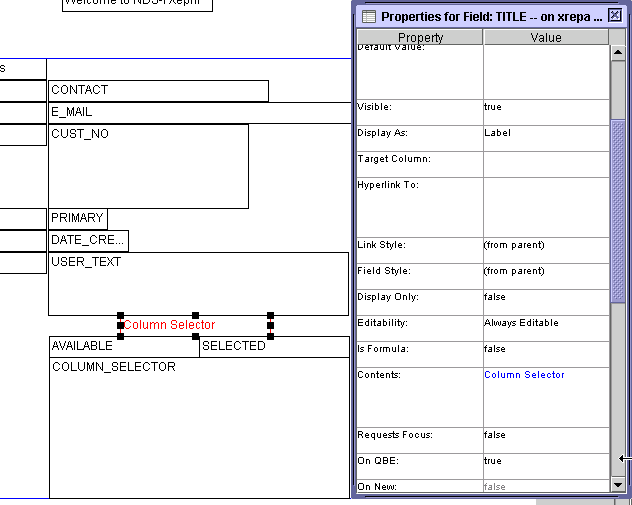
Expand the CUST_CONTACT (qbe,list) block. Left click on the COLUMN_SELECTOR field and display the property sheet for the label.
In the Display
As property, select QBE Column Selector.
Right click on the block and select
Designer Frame to display the
Designer Tool.
Expand the Designer Tool until you can see the entire block. We need to lengthen the block and then move the fields around until they are where we want them.
Click on the background of the block
to select it. Then, hover your cursor over the
bottom edge of the block until it turns into a double headed arrow. Hold
down your left mouse button and drag the edge of the block down until
it looks like this:
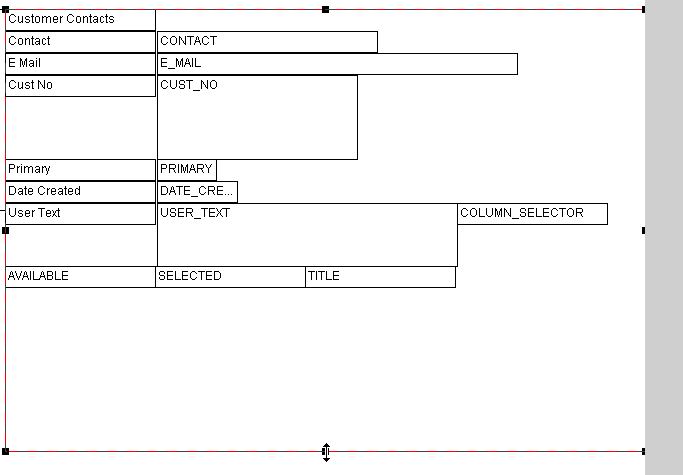
Now, move the four fields around
in the block until they are laid out like this:
The column selector fields starts out the same size as any other field, but it needs to be larger to accommodate the functionality.
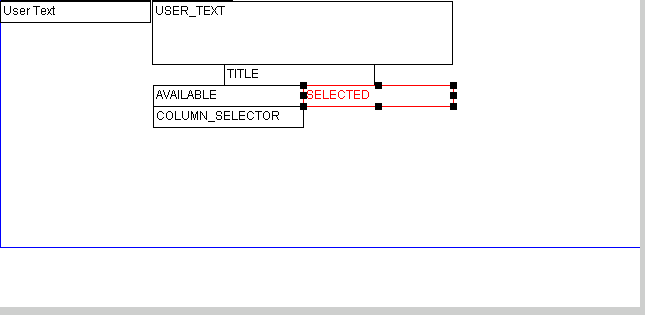
In the Designer Tool, click on the
COLUMN_SELECTOR block to select it. Then, hover
your cursor over the right edge of the block until it turns into a double
headed arrow. Hold down your left mouse button
and drag the edge of the block to the right until it lines up with the
right side of the SELECTED field.
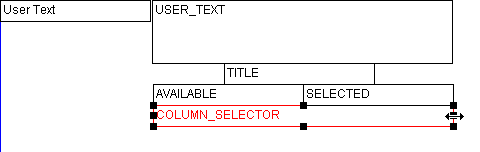
Hover your cursor over the bottom
edge of the block until it turns into a double-headed arrow. Hold
down your left mouse button and drag the edge of the block down until
it touches the bottom of the block.

We need to change the text in the TITLE, AVAILABLE, and SELECTED fields.
Select the TITLE field and double click to display the property sheet.
In the Contents
property, enter Column Selector.
Select the AVAILABLE field and double click to display the property sheet.
In the Contents property, enter Available.
Select the SELECTED field and double click to display the property sheet.
In the Contents property, enter Selected.
Press the Save
button to save the changes.
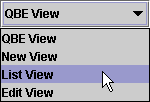
Some changes are also needed for the list block.
In the pop-list in the upper right corner of the Designer
Tool, select List View.
Since we enlarged the QBE block, the list block is now too far up on the screen. We need to make the screen larger, and move the block down.
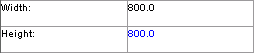
In the Explorer Tree, select the CONTACT entity and display the property sheet.
In the Height
property, enter 800.
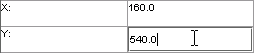
Now, left click on the CUST_CONTACT_CONTAINER (list) block and display the property sheet.
In the Y
property, enter 540.
Expand the CUST_CONTACT_CONTAINER (list) block. Then expand the CUST_CONTACT block.
For each field on the CUST_CONTACT block, we need to modify the Tool Top property to contain the text to be displayed for that field in the column selector.
|
Column |
ToolTip |
|
CONTACT |
Contact |
|
E_MAIL |
|
|
CUST_NO |
Customer Number |
|
PRIMARY |
Primary Flag |
|
DATE_CREATED |
Date Created |
Press the Save
button to save the changes.
We want contact, email, and date created to be automatically selected, and we want cust_no, and primary to be available for selection, but not selected. The Visible property for the field and its label determines whether or not the field is automatically selected.
In the CUST_CONTACT block, the Visible property should be set as follows for these fields.
|
Column |
Visible |
|
CONTACT |
true |
|
E_MAIL |
true |
|
CUST_NO |
false |
|
PRIMARY |
false |
|
DATE_CREATED |
true |
In the CUST_CONTACT_HEADER block, the Visible property should be set as follows for these fields.
|
Column |
Visible |
|
L_CONTACT |
true |
|
L_E_MAIL |
true |
|
L_CUST_NO |
false |
|
L_PRIMARY |
false |
|
L_DATE_CREATED |
true |
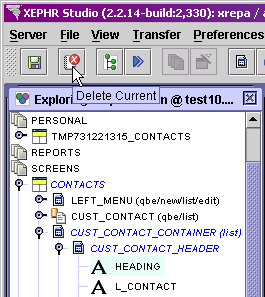
For List blocks that are using the QBE Column Selector, the number of fields in the header and the database block needs to be the same. The HEADING field is an extra field, so we will delete it.
Left click on the HEADING field
and click on the Delete Current
button in the header.
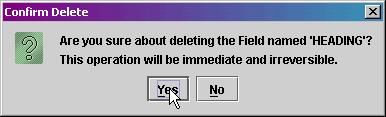
The Confirm
Delete pop-up is displayed. Click Yes.
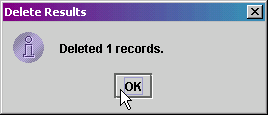
The Delete
Results pop-up is displayed. Click Ok.
We also need a label field for the CONTACT_ID field, and the labels in the header need to have the same Z orders as their corresponding fields in the database block.
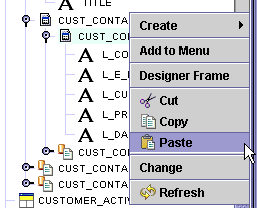
Right click on the L_DATE_CREATED
field in the Explorer Tree and select Copy
from the menu.
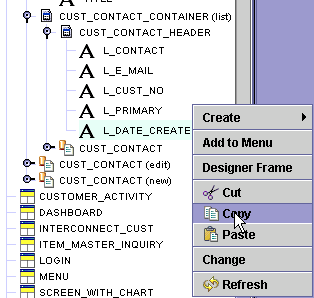
Right click on the CUST_CONTACT_HEADER
block in the Explorer Tree and select Paste
from the menu.
Display the property sheet for the pasted field.
In the Name field, enter L_CONTACT_ID
In the Contents field, enter Contact ID.
Set the Visible flag to false since we do not want this field displayed on the list screen.
For each of the label fields in the CUST_CONTACT_HEADER block, set the Z Order property to the following values:
|
Column |
Z Order |
|
L_CONTACT |
1 |
|
L_E_MAIL |
2 |
|
L_CUST_NO |
3 |
|
L_PRIMARY |
4 |
|
L_DATE_CREATED |
5 |
Press the Save
button to save the changes.
We need the CONTACT_ID field included on the list block, but we don't want it to be displayed in the QBE Column Selector. Left click on this field and display the property sheet.
Set the Suppress
on CSO property to true.

Press the Save
button to save the changes.
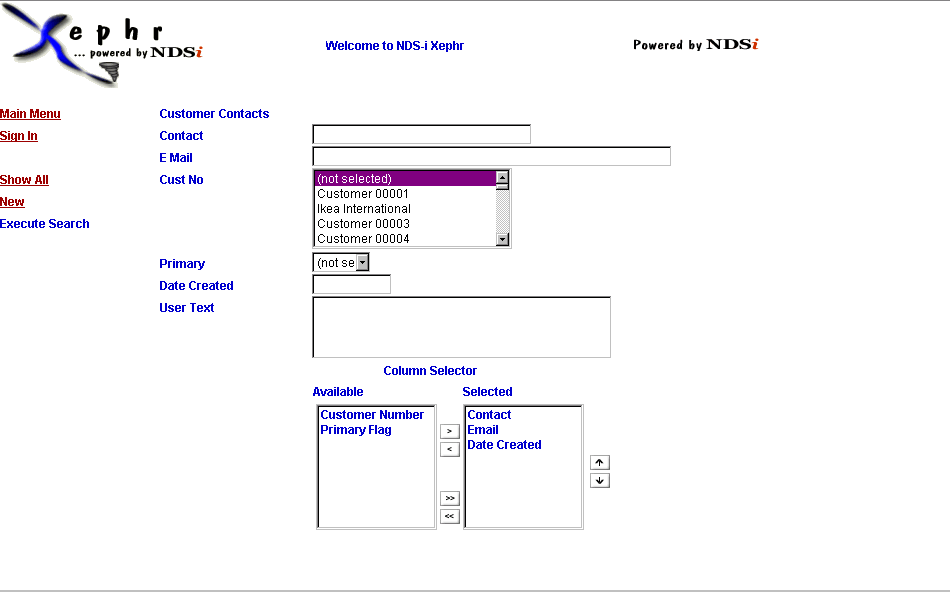
To test the new screen entity, highlight
it by selecting it, and click on the Run
 button in the main toolbar.
The Preparing to Run screen is displayed. Press
the Run button.
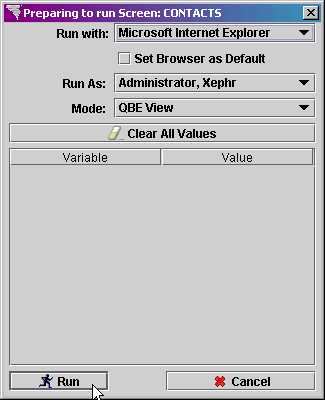
The entity is run in the browser.