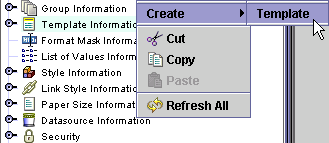
Although Xephr Repositories are initialized with a template for each
entity type, we are going to create a new template in order to familiarize
you with the process.
Right click on the Template
Information object.
Select Create
> Template from the menu.

The Creating
an Entity screen is displayed.
Click on the Data
Exchange bullet.

Click on the Next
button at the bottom of the screen.
In the Entity
Name field, enter DATA_TEMPLATE.
Leave the Datasource
pop-list set to (use default), which will default any entities created
from this template to the repositories default datasource.
Leave the Based
On pop-list set to (NONE), as we are not basing this template off
of any other template.
Leave the Default
Mode pop-list set to Run Report.
In the Body
Style pop-list, select DEFAULT_STYLE as the default body style.
In the Editable
Field Style pop-list, select DEFAULT_DATA_ENTRY as the default
style for any fields that allow entry, such as fields on parameter forms.
In the Non-Editable
Field Style pop-list, select DEFAULT_STYLE for non-editable fields,
such as labels.
In the Lov
Style pop-list, select DEFAULT_STYLE as the default style for list
of values associated with this entity.
In the Link
Style pop-list, select LINKS as the default style for hyperlinks
on this entity.

Click on the Finish
button at the bottom of the screen.
The template is created and displayed
in green in the Explorer Tree.
Click on the Save
 button in the main toolbar to save the new template.
Click on the DATA_TEMPLATE entity.
Verify that these settings are acceptable. For
more information on these settings, see either the Property
Definitions section or the Data
Exchange Templates section.
Click on the Save
 button in the main toolbar to save the changes.
Now we will create a data exchange entity that will export country codes
using the template we just created.
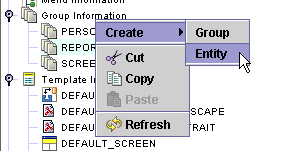
Select the Group
Information object. Expand it, and select
the group to which you wish to add the new data exchange entity.
Right click on the group and select
New->Wizard->Entity.

Click on the Data
Exchange bullet.

Click on the Next
button at the bottom right of the screen.
In the Entity
Name property, type COUNTRY_CSV as the entity name.
Leave the Datasource
property set to (use default), since there is only one datasource for
the Xephr install.
In the Based
On property, select DATA_TEMPLATE, which is the template that we
created earlier.
Leave the Default
Mode set to Run Report.
Leave the Body
Style property set to (from parent) to indicate that the style
should be obtained from this entity's template.
Leave the Editable
Field Style property set to (from parent) to indicate that the
style should be obtained from this entity's template.
Leave the Non
Editable Field Style property set to (from parent) to indicate
that the style should be obtained from this entity's template.
Leave the Lov
Style property set to (from parent) to indicate that the style
should be obtained from this entity's template.
Leave the Link
Style property set to (from parent) to indicate that the style
should be obtained from this entity's template.

Click on the Next
button at the bottom right of the screen.
In the Block
Name property, enter COUNTRY_CODES as the name of the block.
In the Block
Type property, select Standard Block.
Set the Query
Type property to Simple Query.
Leave the Datasource
property set to (use default), since there is only one datasource for
the Xephr install.
In the Table
property, select the name of the table or view from which you are exporting
the data. Since our datasource is set to use the
Oracle 9i database for NDS Applications, we will select the view COUNTRY_UVW.
Leave the Create
Heading flag set to off.
In the Scheme
Selection section, set the List bullet to on.
This block will display multiple records, and the labels need to be
displayed in a row at the top, while each record needs to be displayed
in a row beneath that. The list scheme will lay
out the records in this fashion.

Click on the Next
button at the bottom right of the screen.
The Adding
Fields screen is displayed. Select the columns
that you wish to include in the export.
Click on the name of the column
to select both the Field and Label checkboxes for that column. Do
this for the following columns:
Click on the Next
button at the bottom of the screen to continue.
The Ordering Fields
screen is displayed next. The columns are initially
ordered as they were listed on the previous screen.
To move a field up or down, highlight the desired field by selecting
it, and click on the Move Up or Move Down buttons on the right of the
screen.

Click on the Next
button when you have finished moving the fields.
The Option to Add More
screen is displayed. We have no more blocks to
add, so click on the Finish button.

The new entity is added to the initially selected group.
Click on the Save
 button in the main toolbar to save the new data exchange entity.

To test the new data exchange entity, highlight it by
selecting it, and click on the Run  button in the main toolbar.
The Preparing to Run Data Exchange screen will be displayed,
click on the Run button on the bottom left.

The file will be opened in the browser, displaying entity's
block.
Xephr is a registered trademark of NDS Systems, LC.


 button in the main toolbar to save the new template.
 button in the main toolbar to save the changes.


 button in the main toolbar.